A Quick Look at Several Useful APIs in Ramda
Introduction
Ramda is an exceptionally useful library. If you’ve heard of Lodash or Underscore, you can think of Ramda as the functional programming version of Lodash. Their APIs share many similarities, but the key difference is that Ramda is inherently built for FP: whenever you don’t supply all arguments to any API, Ramda automatically curries it for you, providing immense flexibility.
For example, in Lodash, the common way to use an API is:
_.map([1, 2, 3], n => n * 2) // [2, 4, 6]Whereas in Ramda, it is:
R.map(n => n * 2, [1, 2, 3]) // [2, 4, 6]Or you can write it like this:
const times2 = R.map(n => n * 2) // return function
times2([1, 2, 3]) // [2, 4, 6]
This approach frees us from being tightly coupled to the data and significantly improves reusability.
If you would like to learn more about FP, I recommend this article: Why Functional Programming Matters.
An Intuitive Understanding of Functional Programming
- The same input always produces the same output, unaffected by external state.
- No side effects.
Why Choose Ramda
Ramda has a large number of APIs, most of which are quite intuitive, so there is no need to cover them all in detail. However, Ramda offers many excellent APIs that can help reduce development complexity. Below are a few that I find particularly worth looking at.
propEq
Accepts a string as a property name and checks whether the value of that property in the passed-in object is equal to a given value.
const obj = {
  name: "kalan",
}

propEq("name", "kalan")(obj) // true

// 等價於
const propEq = (name, value) => obj => {
  return obj[name] === value
}
zipObj
Zips the passed-in arguments into an object.
R.zipObj(["id", "title"], ["2", "mytitle"])
/*
{
  id: '2',
  title: 'mytitle'
}
*/
ifElse
Extremely useful when implementing branching logic. You might wonder: why not just use if…else directly? All APIs in Ramda return functions, which means you can combine them with other APIs using compose.
compose
Composes functions, executing from the inside out (right to left). You can think of it like the high-school math notation f(g(h(x))), where you first compute the value of h(x) and proceed outward.
const a = compose(
  toInteger,
  toCurrency("TWD"),
  toUppercase
)("125000")
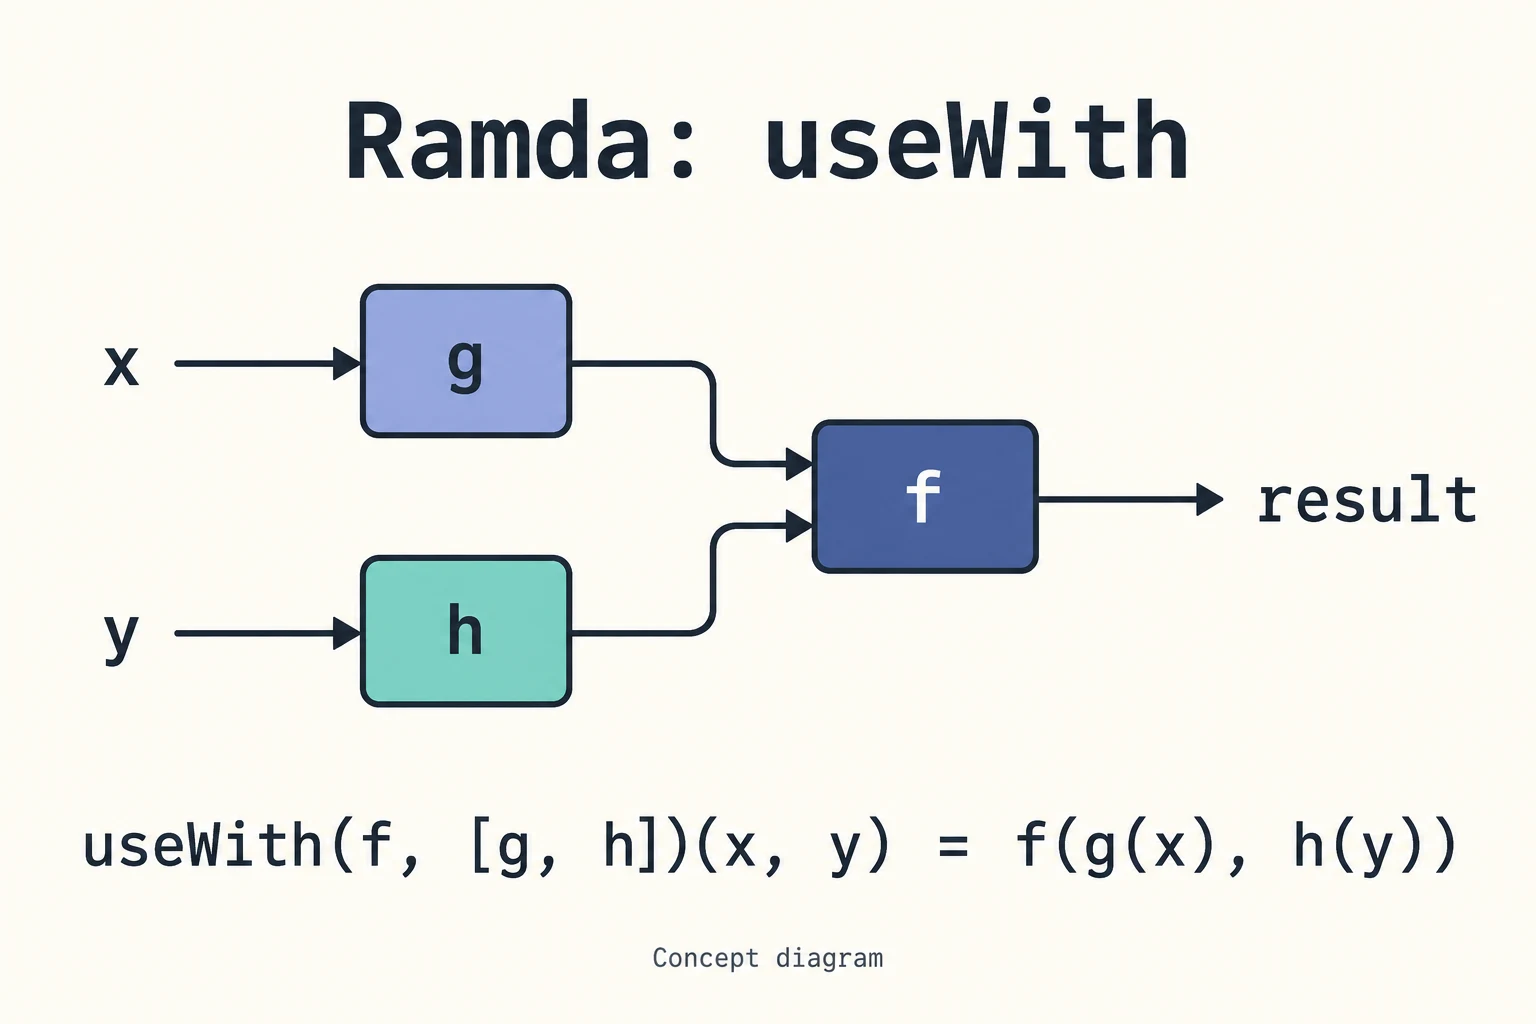
useWith
Accepts a function and an array of functions. It passes the arguments through the respective functions in the array, then passes the resulting values to the primary function.
Using useWith effectively helps achieve a point-free style.
const currencies = [
  { name: "TWD", shape: "$" },
  { name: "USD", shape: "$" },
  { name: "JPY", shape: "¥" },
  { name: "CAD", shape: "$" },
]

// without useWith
const getCurrency = (name, dic) => R.find(R.propEq("name", name), dic)

getCurrency("TWD", currencies) // $

// with useWith
const getCurrency = R.useWith(R.find, [R.propEq("name"), R.identity]) // 將第一個參數傳入 R.propEq,第二個參數傳入 R.identity,運算後的結果分別丟給 R.find 的第一與第二個參數。

getCurrency("TWD", currencies)
Using useWith eliminates the need to explicitly handle the name and dic parameters.
converge
This function is somewhat similar to useWith above, but converge passes the same argument(s) to each branch function. The diagram below provides an intuitive look at the difference between the two.
const numbers = [1, 2, 5, 8, 10]

const getRange = R.converge(substract, [getFirst, getLast])(numbers) // return 9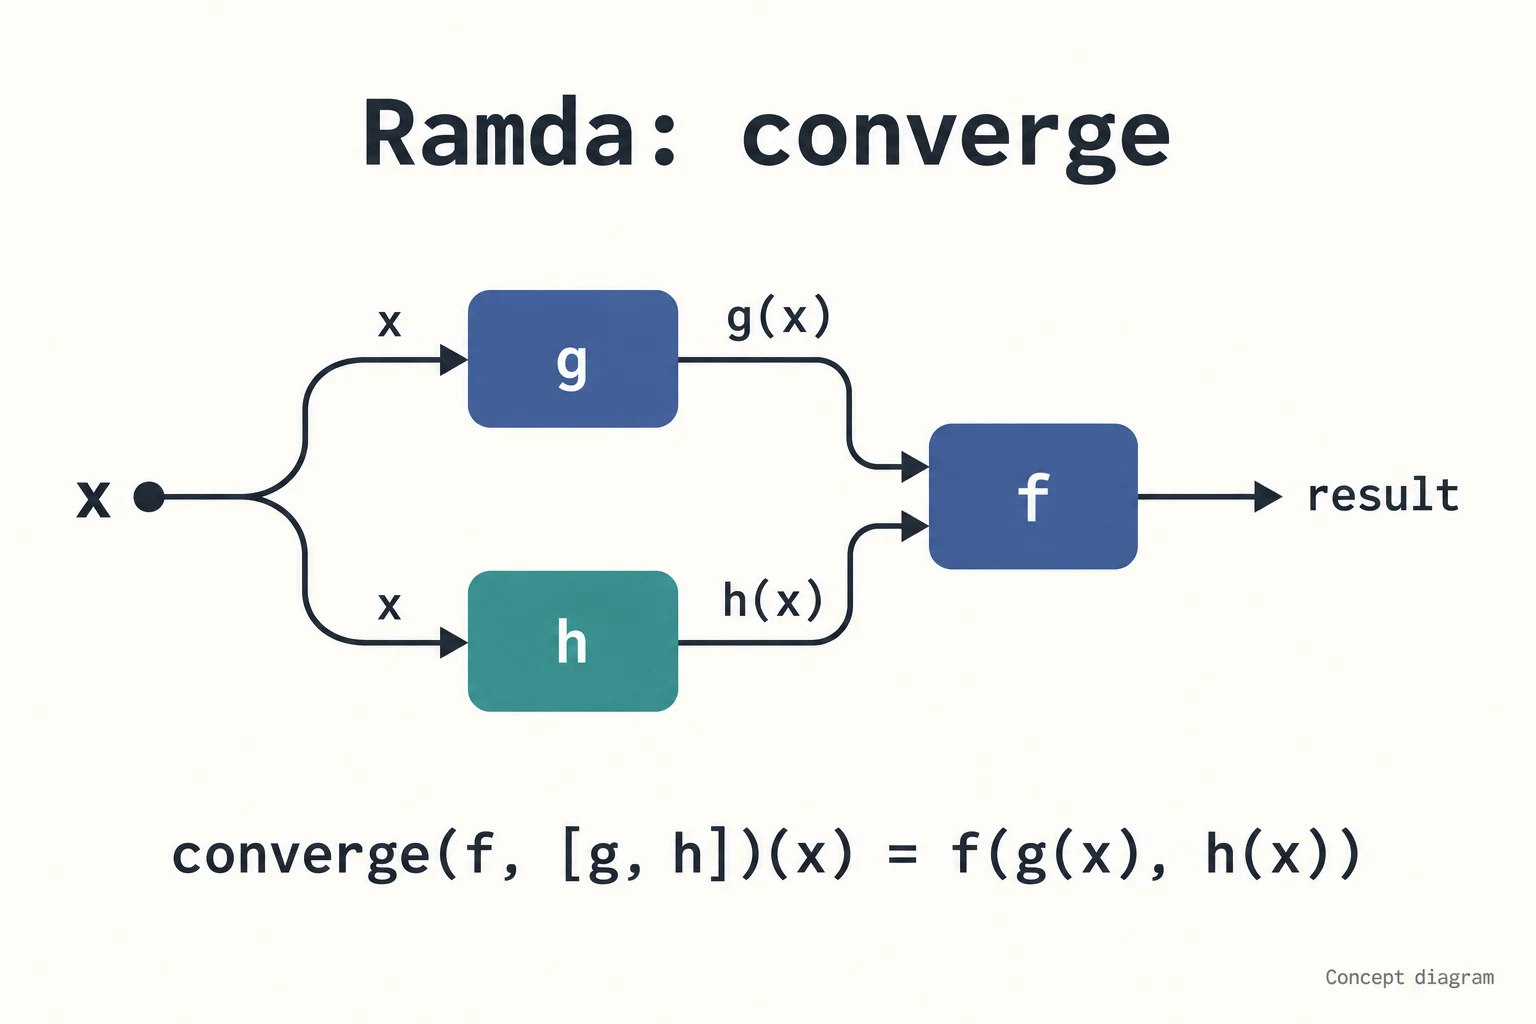
identity
It’s almost too intuitive… to the point where it’s hard to explain in words. It’s faster to explain directly through code:
const identify = arg => argWhy would you need this? Sometimes you need to structure your functions to make them chainable or composable, and that’s when the identity function comes in handy.
tap
Passes an argument to a given function and returns the original value. This is especially useful for debugging or bridging with third-party utilities.
tap(console.log)("hello world") // 傳入 hello world 給 console.log,並且回傳 hello world 這個值The example above might not clearly show the utility of tap. Let’s look at how it works in combination with compose:
const uploadToMedium = article => API.postArticle(article)
const notifyAdmin = article => API.notify(article, subscribers)
const log = article => Logger.log(article)
const preprocessArticle = article => article.toLowerCase()

const publishPostFlow = article =>
  compose(
    preprocessArticle,
    R.tap(uploadToMedium),
    R.tap(notifyAdmin),
    R.tap(log)
  )

publishPostFlow(article)
This way, we can easily pipe operations to other services without writing repetitive code like return article. It cuts down on boilerplate code while minimizing the potential for mistakes.
pluck
Just like the name suggests, it plucks the value of a specified property to create a new array. It is particularly helpful when extracting values from nested objects:
const data = [
  {
    id: "1",
    content: "content...",
  },
  {
    id: "2",
    content: "content...",
  },
  {
    id: "3",
    content: "content...",
  },
]

const getIds = R.pluck("id", data) // return ['1','2','3']
pick, pickBy, pickAll
In practice, we rarely need every single property on an object; often, we just want to extract a specific subset. The three functions in the pick family make this straightforward:
const data = {
  url: "https://api.github.com/repos/example/magazine/issues/1",
  repository_url: "https://api.github.com/repos/example/magazine",
  labels_url:
    "https://api.github.com/repos/example/magazine/issues/1/labels{/name}",
  comments_url:
    "https://api.github.com/repos/example/magazine/issues/1/comments",
  events_url: "https://api.github.com/repos/example/magazine/issues/1/events",
  html_url: "https://github.com/example/magazine/issues/1",
  id: 252372781,
  number: 1,
  title: "test issue",
}

R.pick(["url", "repository_url", "id", "name"], data) // 回傳這三個屬性的值,如果找不到此屬性直接忽略

R.pickAll(["url", "repository_url", "name"], data) // 回傳值如果屬性存在,沒有的話會回傳 undefined

const isURL = (value, key) => key.indexOf("_url") !== -1
R.pickBy(isURL, data) // 回傳任何屬性含有 _url
pathOr
When the frontend calls a backend API, the returned JSON can sometimes have a deeply nested structure. Using traditional checks like a && a.b && a.b.c not only clutters the code, but also requires more conditional checks as the nesting grows deeper.
pathOr accepts an array defining the access path. If accessing the path yields undefined, it will return the default value instead.
const article = {
  id: "116208916",
  author: {
    information: {
      birthday: "1994-11-11",
      name: "kalan",
    },
    subscribers_count: 1239,
  },
  content: {
    title: "title",
    body: "body",
  },
}
If the backend response is missing fields, runtime errors can easily occur. pathOr gracefully handles this scenario. If the birthday has no value, it will fall back to the string “未提供生日”.
const getBirthday = R.pathOr(
  ["author", "information", "birthday"],
  "未提供生日"
)
getBirthday(article)
memoize
In computationally intensive scenarios like calculating prime numbers or factorials, you can use the memoize function to cache previously calculated results rather than recomputing them each time.
Conclusion
Ramda is a remarkably handy library. This article highlighted a few APIs that might be less familiar in day-to-day operations, but Ramda’s API documentation is extensive. Combined with compose, you can freely assemble your own functions and use the methods mentioned above to simplify your codebase.
If you enjoy this style of programming, welcome to the world of functional programming!
Related Posts
- Recreating My Room with Three.js Using React Three Fiber, I brought my real room into the browser—turning physical objects into an interactive table of contents, and using spatial memory to tell the story of my life and work over the past few years.
- Things to Keep in Mind When Using Images in Frontend Development Expanding on Jake Archibald's article, this post organizes how modern responsive images should be written: why width/height are still necessary, when to use CSS aspect-ratio, how to choose between AVIF and WebP, and using picture/source/srcset for art direction on mobile devices.
- CSS field-sizing — Auto-resize Form Elements with a Single Line of CSS Previously, auto-resizing a textarea required listening to scrollHeight in JavaScript. With CSS field-sizing: content, a single line replaces it all, supporting textarea, input, and select. This article covers the pain points of older approaches and how to use field-sizing.
- Make Your Link Underlines Look Better: text-underline-offset By default, underlines sit very close to the text. Some designers dislike this look, and personally, I don't think it looks great either.